Event in ABAP report determine process flow of a program. The events are triggered depended on the way the output is generated. They begin after event keyword and end when the next event reached.
Event keyword:
INITIALIZATION.
Occurs when report initialized.
We can use it to check user authorization or prepare output for selection screen.
AT SELECTION-SCREEN OUTPUT :
Occurs each time selection screen about to generated.
We can use it to modify selection screen, for example hide / unhide parameter.
AT SELECTION-SCREEN.
Occurs each user command in selection screen. we can use it to perform checking on user input.
START-OF-SELECTION
Occurs after the standard selection screen has been processed.,
data is read in this event.
END-OF-SELECTION
Occurs after start-of-selection.
TOP-OF-PAGE
Occurs when a new page starts.
Use it for write report header.
END-OF-PAGE
Occurs when a page ends.
Use it for write report footer.
AT LINE-SELECTION
Occurs when the user double-click on report.
AT USER-COMMAND
Occurs when the user push toolbar button.
This is program to demonstrate how to use event properly.
REPORT ZAALGAL0008
LINE-COUNT 10(1).
*http://abap-gallery.blogspot.com
TABLES: sflight.
DATA: BEGIN OF t_report OCCURS 3,
carrid LIKE sflight-carrid,
connid LIKE sflight-connid,
END OF t_report.
*begin selection screen
PARAMETERS p_datum LIKE sy-datum.
PARAMETERS p_check AS CHECKBOX.
*end selection screen
INITIALIZATION.
*begin initialization
MOVE sy-datum TO p_datum.
*end initialization
AT SELECTION-SCREEN.
*begin at selection-screen
MESSAGE I888(sabapdocu) WITH 'At selection-screen'.
IF p_check = 'X'.
MESSAGE E888(sabapdocu) WITH 'Clear checkbox'.
ENDIF.
*end at selection-screen
AT SELECTION-SCREEN OUTPUT.
*begin at selection-screen output
MESSAGE I888(sabapdocu) WITH 'At selection-screen output'.
*end at selection-screen output
START-OF-SELECTION.
*begin start-of-selection.
MESSAGE I888(sabapdocu) WITH 'start-of-selection'.
SELECT * FROM sflight.
MOVE sflight-carrid TO t_report-carrid.
MOVE sflight-connid TO t_report-connid.
APPEND t_report.
ENDSELECT.
*end start-of-selection.
END-OF-SELECTION.
*begin end-of-selection.
MESSAGE I888(sabapdocu) WITH 'end-of-selection'.
FORMAT COLOR col_normal.
DO 30 TIMES.
LOOP AT t_report.
WRITE / t_report-carrid.
WRITE t_report-connid.
ENDLOOP.
ENDDO.
*end end-of-selection.
TOP-OF-PAGE.
FORMAT COLOR col_heading.
WRITE 'This is header'.
END-OF-PAGE.
FORMAT COLOR col_total.
WRITE 'This is footer'.
AT LINE-SELECTION.
WRITE: / 'Cursor Row:', sy-curow.
WRITE: / 'Cursor Col:', sy-cucol.
Friday, August 10, 2007
Event in ABAP Report

Tuesday, July 31, 2007
Tabstrip in selection screen
To define a tabstrip area with tab pages in selection screen, use the following statements in your selection screen definition:
SELECTION-SCREEN: BEGIN OF TABBED BLOCKFOR LINES,
TAB () USER-COMMAND
[DEFAULT [PROGRAM] SCREEN ],
TAB () USER-COMMAND
[DEFAULT [PROGRAM] SCREEN ],
...
END OF BLOCK.
This defines a tabstrip control
For each tab title, the system automatically creates a character field in the ABAP program with the same name. In ititialization, you can assign a text to the field. This then appears as the title of the corresponding tab page on the selection screen.
You must assign a subscreen to each tab title. This will be displayed in the tab area when the user chooses that title. You can assign one of the following as a subscreen:
1. A subscreen screen defined using the Screen Painter.
The dialog modules containing its flow logic must be defined in the current ABAP program.
2. A selection screen subscreen, defined in an ABAP program.
User actions will trigger the AT SELECTION-SCREEN event at least twice – firstly for the "included" selection screen (we can use it for validation), then for the selection screen on which it appears.
This is simple program with three tab title.
Tab1 demonstrating input validation.
Don't forget to create subscreen 0300 for Tab3.
REPORT ZAALGAL0007.
*http://abap-gallery.blogspot.com
TABLES: sscrfields.
* SUBSCREEN 1 For Tabstrip BUTTON1
SELECTION-SCREEN BEGIN OF SCREEN 100 AS SUBSCREEN.
SELECTION-SCREEN BEGIN OF BLOCK b1 WITH FRAME.
PARAMETERS: p1(10) TYPE c,
p2(10) TYPE c,
p3(10) TYPE c.
SELECTION-SCREEN END OF BLOCK b1.
SELECTION-SCREEN END OF SCREEN 100.
* SUBSCREEN 2 For Tabstrip BUTTON2
SELECTION-SCREEN BEGIN OF SCREEN 200 AS SUBSCREEN.
SELECTION-SCREEN BEGIN OF BLOCK b2 WITH FRAME.
PARAMETERS: q1(10) TYPE c OBLIGATORY,
q2(10) TYPE c.
SELECTION-SCREEN END OF BLOCK b2.
SELECTION-SCREEN END OF SCREEN 200.
* Go to tcode SE51 Create screen no 0300
* with screen type = subscreen
* STANDARD SELECTION SCREEN
PARAMETERS: h1(10) TYPE c.
SELECTION-SCREEN: BEGIN OF TABBED BLOCK mytab FOR 10 LINES,
TAB (20) button1 USER-COMMAND push1
DEFAULT SCREEN 100,
TAB (20) button2 USER-COMMAND push2
DEFAULT SCREEN 200,
TAB (20) button3 USER-COMMAND push3
DEFAULT SCREEN 300,
END OF BLOCK mytab.
INITIALIZATION.
button1 = 'This is sel-screen 100'.
button2 = 'This is sel-screen 200'.
button3 = 'This is screen 300'.
mytab-prog = sy-repid.
mytab-dynnr = 100.
mytab-activetab = 'BUTTON1'.
AT SELECTION-SCREEN.
CASE sy-dynnr.
WHEN 1000.
WHEN 100.
IF p1 IS INITIAL.
sscrfields-ucomm = 'PUSH1'.
MESSAGE I888(sabapdocu) WITH 'Make an entry in P1'.
ENDIF.
WHEN 200.
MESSAGE s888(sabapdocu) WITH 'Validation on' sy-dynnr.
ENDCASE.
START-OF-SELECTION.
WRITE: / 'P1:', p1,'Q1:', q1,
/ 'P2:', p2,'Q2:', q2,
/ 'P3:', p3.
Read More......
Thursday, July 26, 2007
Change layout format in ALV
Layout format in ALV defined in structure IS_LAYOUT as importing structure of ALV REUSE_ALV_LIST_DISPLAY.
CALL FUNCTION 'REUSE_ALV_LIST_DISPLAY'
EXPORTING
......
is_layout = wa_layout
......
EXCEPTIONS
program_error = 1
OTHERS = 2.
Commonly used field:
- IS_LAYOUT-ZEBRA: X=striped (zebra) pattern
- IS_LAYOUT-BOX_FIELDNAME: insert column checkbox for each row to select row.
How to inset checkbox:
1. insert new field with type C in internal table ALV data to record selection indicator (X:selected).
Example:
DATA: BEGIN OF t_alv OCCURS 1,
field1,
field2,
...
BOX,
END Of T_alv.
2. set IS_LAYOUT-BOX_FIELDNAME = fieldname in internal table ALV data.
Example:
IS_LAYOUT-BOX_FIELDNAME = 'BOX'.
3. At run time, t_alv-box will filled with 'X' for selected data.
CheckBox can be initiated in these ways:
1: selected, can not be changed
0: not selected, can not be changed
X: selected, can be changed
SPACE (blank):not selected, can be changed
-: disable check box
- IS_LAYOUT-COL_FIELDNAME
Cells can be colored individually using a color code which is contained in a column of the internal output table for the record containing the cell.
Assign the name of the field to this parameter.
The internal output table field must be of type SLIS_T_SPECIALCOL_ALV.
Principle: the color code field is entered for the record containing the cells to be colored. The field contains an internal table with the above structure, containing the field names of the cells to be colored and the color code. The cell coordinates are determined by the record position containing the color code and the column information in the color table.
The record structure of the internal color table of type SLIS_T_SPECIALCOL_ALV is as follows:
Color table-FIELDNAME = field name of the cell to be colored
Color table-COLOR-COL = color number (1 - 9)
Color table-COLOR-INT = bold (0 = off, 1 = on)
Color table-COLOR-INV = inverse (0 = off, 1 = on)
Color table-NOKEYCOL = ignore key coloring ('X' = yes, ' ' = no)
If the parameter color table-FIELDNAME is not filled, the coloring applies to all fields, so the entire record is colored.
Read More......
Field catalog in ALV
Field catalog containing descriptions of the list output fields. You can use fields of the catalog to determine the number format and column properties of the list to be displayed.
The field catalog contains more than 60 fields, some of which are only used internally. The field catalog is defined in the Data Dictionary through table type LVC_T_FCAT.
We can get field description by calling function module REUSE_ALV_FIELDCATALOG_MERGE. You can see the sample in my post about Simple ALV Report.
In general case, we only use few field to describe output field.
To make it easier I use this form:
FORM f_alv_fieldcatg USING
fu_types "internal table name
fu_fname "Field name of internal table field
fu_reftb "reference table name
fu_refld "reference table field
fu_noout "X= No out
fu_outln "out
fu_fltxt "output length
fu_dosum "X=Do sum (total)
fu_hotsp "X=hotspot on
fu_just. "Justification:L,R,C
CLEAR: t_fieldcat.
t_fieldcat-tabname = fu_types.
t_fieldcat-fieldname = fu_fname.
t_fieldcat-ref_tabname = fu_reftb.
t_fieldcat-ref_fieldname = fu_refld.
t_fieldcat-no_out = fu_noout.
t_fieldcat-outputlen = fu_outln.
t_fieldcat-seltext_l = fu_fltxt.
t_fieldcat-seltext_m = fu_fltxt.
t_fieldcat-seltext_s = fu_fltxt.
t_fieldcat-reptext_ddic = fu_fltxt.
t_fieldcat-no_out = fu_noout.
t_fieldcat-do_sum = fu_dosum.
t_fieldcat-hotspot = fu_hotsp.
t_fieldcat-just = fu_just.
APPEND t_fieldcat.
CLEAR t_fieldcat.
ENDFORM. " f_alv_fieldcatg
We can use it in two way:
1. refer to data dictionary:
PERFORM f_alv_fieldcatg USING 'T_REPORT' :
'EQUNR' 'EQUI' 'EQUNR' '' '' '' '' 'X' '',
'SPART' 'VBAK' 'SPART' '' '' '' '' '' ''.
2. or define yourself
PERFORM f_alv_fieldcatg USING 'T_REPORT' :
'FIELD1' '' '' '' '20' 'Text Field1' '' '' ''.
and for field with type number, I use this:
*&---------------------------------------------------------------------*
*& Form f_alv_fieldcatg_number
*&---------------------------------------------------------------------*
* text
*----------------------------------------------------------------------*
FORM f_alv_fieldcatg_number USING fu_types
fu_fname
fu_noout
fu_outln
fu_no_sign
fu_no_zero
fu_fltxt
fu_dosum
fu_exponent
fu_decimals_out.
CLEAR: t_fieldcat.
t_fieldcat-tabname = fu_types.
t_fieldcat-fieldname = fu_fname.
t_fieldcat-no_out = fu_noout.
t_fieldcat-outputlen = fu_outln.
t_fieldcat-seltext_l = fu_fltxt.
t_fieldcat-seltext_m = fu_fltxt.
t_fieldcat-seltext_s = fu_fltxt.
t_fieldcat-reptext_ddic = fu_fltxt.
t_fieldcat-no_zero = fu_no_zero.
t_fieldcat-no_sign = fu_no_sign.
t_fieldcat-exponent = fu_exponent.
t_fieldcat-decimals_out = fu_decimals_out.
t_fieldcat-do_sum = fu_dosum.
t_fieldcat-datatype = 'FLTP'.
APPEND t_fieldcat.
CLEAR t_fieldcat.
ENDFORM. " f_alv_fieldcatg_number
For field currency, there are two options, fixed currency or variable currency.
*&---------------------------------------------------------------------*
*& Form f_alv_fieldcatg_curr
*&---------------------------------------------------------------------*
* text
*----------------------------------------------------------------------*
FORM f_alv_fieldcatg_curr USING fu_types
fu_fname
fu_reftb
fu_refld
fu_noout
fu_outln
fu_fltxt
fu_dosum
fu_hotsp
fu_cfield.
CLEAR: t_fieldcat.
t_fieldcat-tabname = fu_types.
t_fieldcat-fieldname = fu_fname.
t_fieldcat-ref_tabname = fu_reftb.
t_fieldcat-ref_fieldname = fu_refld.
t_fieldcat-no_out = fu_noout.
t_fieldcat-outputlen = fu_outln.
t_fieldcat-seltext_l = fu_fltxt.
t_fieldcat-seltext_m = fu_fltxt.
t_fieldcat-seltext_s = fu_fltxt.
t_fieldcat-reptext_ddic = fu_fltxt.
t_fieldcat-do_sum = fu_dosum.
t_fieldcat-hotspot = fu_hotsp.
t_fieldcat-cfieldname = fu_cfield.
t_fieldcat-ctabname = fu_types.
t_fieldcat-no_zero = 'X'.
APPEND t_fieldcat.
CLEAR t_fieldcat.
ENDFORM. " F_FIELDCATG_CURR
*&---------------------------------------------------------------------*
*& Form f_alv_fieldcatg_curr
*&---------------------------------------------------------------------*
* text
*----------------------------------------------------------------------*
FORM f_alv_fieldcatg_curr_fixed USING fu_types
fu_fname
fu_reftb
fu_refld
fu_noout
fu_outln
fu_fltxt
fu_dosum
fu_hotsp
fu_curr.
CLEAR: t_fieldcat.
t_fieldcat-tabname = fu_types.
t_fieldcat-fieldname = fu_fname.
t_fieldcat-ref_tabname = fu_reftb.
t_fieldcat-ref_fieldname = fu_refld.
t_fieldcat-no_out = fu_noout.
t_fieldcat-outputlen = fu_outln.
t_fieldcat-seltext_l = fu_fltxt.
t_fieldcat-seltext_m = fu_fltxt.
t_fieldcat-seltext_s = fu_fltxt.
t_fieldcat-reptext_ddic = fu_fltxt.
t_fieldcat-do_sum = fu_dosum.
t_fieldcat-hotspot = fu_hotsp.
* t_fieldcat-cfieldname = fu_cfield.
* t_fieldcat-ctabname = fu_types.
t_fieldcat-datatype = 'CURR'.
t_fieldcat-currency = fu_curr.
t_fieldcat-no_zero = 'X'.
APPEND t_fieldcat.
CLEAR t_fieldcat.
ENDFORM. " F_FIELDCATG_CURR
Wednesday, July 25, 2007
Hide parameter / select option in selection screen
We can Hide parameter / select option in selection screen dynamically by manipulating screen object.
SCREEN is like an internal table with a header line. However, you do not have to declare it in your program. Go to debugging mode and then view structure of screen.
You can modify SCREEN in your ABAP program during the PBO event of a screen. Its contents override the static attributes of the screen fields for a single screen call. The only statements that you can use with SCREEN are:
LOOP AT SCREEN.
...
MODIFY SCREEN.
...
ENDLOOP.
We can hide parameter by set screen-active to 0.
Here is example of how to hide parameter in selection screen. Write it, and change click on radiobutton to hide parameter.
REPORT ZAALGAL0006.
DATA: d_ucomm LIKE sy-ucomm.
PARAMETERS: p_grpa1(10) MODIF ID A,
p_grpa2(5) MODIF ID A,
p_grpb1(2) MODIF ID B.
PARAMETERS: p_actA RADIOBUTTON GROUP rad1 USER-COMMAND ACT DEFAULT 'X',
p_actB RADIOBUTTON GROUP rad1.
AT SELECTION-SCREEN.
d_ucomm = sy-ucomm.
AT SELECTION-SCREEN OUTPUT.
LOOP AT screen.
IF p_actA = 'X'.
IF screen-group1 = 'B'.
screen-active = 0.
ENDIF.
ELSEIF p_actB = 'X'.
IF screen-group1 = 'A'.
screen-active = 0.
ENDIF.
ENDIF.
MODIFY screen.
ENDLOOP.
START-OF-SELECTION.
Tuesday, July 24, 2007
Add toolbar button on selection screen

Do following step.
1. Declare work area sscrfields.
TABLES: sscrfields.
2. Define text displayed in button in initialization event.
INITIALIZATION.
MOVE 'This is button 1' TO sscrfields-functxt_0n." n = 1 up to 5
3. Activate toolbar in selection screen.
SELECTION-SCREEN FUNCTION KEY n.
4. Check user command in AT selection screen
AT SELECTION-SCREEN.
IF sy-ucomm = 'FC0n'." n = 1 up to 5
....
ENDIF.
This is complete sample:
REPORT ZAALGAL0005 .
TABLES: sscrfields.
DATA: d_butt1(4).
PARAMETERS: p_grpa1(10) MODIF ID A,
p_grpa2(10) MODIF ID A,
p_grpb1(10) MODIF ID B.
SELECTION-SCREEN FUNCTION KEY 1.
SELECTION-SCREEN FUNCTION KEY 2.
INITIALIZATION.
MOVE 'This is button 1' TO sscrfields-functxt_01.
MOVE 'Toggle 1' TO sscrfields-functxt_02.
d_butt1 = 'NO'.
AT SELECTION-SCREEN.
IF sy-ucomm = 'FC01'.
d_butt1 = 'YES'.
sscrfields-ucomm = 'ONLI'.
ELSEIF sy-ucomm = 'FC02'.
IF sscrfields-functxt_02 = 'Toggle 1'.
sscrfields-functxt_02 = 'Toggle 2'.
ELSE.
sscrfields-functxt_02 = 'Toggle 1'.
ENDIF.
ENDIF.
START-OF-SELECTION.
WRITE d_butt1.
Read More......
Monday, July 23, 2007
Debugging ABAP Program
There are two way to alternative way to activate debugging mode:
1. Type "/h" in command field (little box in upper left corner, where we usually type transaction code in it)
2. Go To System -> Utilities -> Debug ABAP
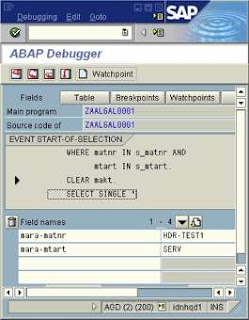
In ABAP debugger we can view and change data. It also allow you to execute your program line by line.
Read More......


